Chocolate Soufflé

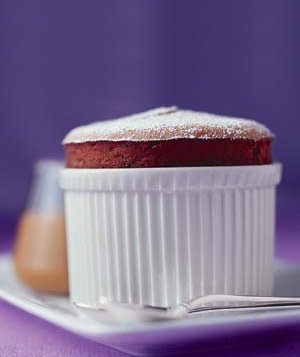
I made these souffles for my ladies on Valentine’s Day this year.  They came out great!  Very simple to make and they were gleefully eaten by all.

INGREDIENTS

  1. tablespoons butter
  2. tablespoons unsweetened cocoa
  3. ounces semisweet or bittersweet chocolate
  4. 1/2 teaspoon vanilla extract
  5. egg yolks
  6. egg whites
  7. tablespoons sugar
  8. pinch salt
  9. pinch cream of tartar

DIRECTIONS

  1. Heat oven to 375° F. Use 1 tablespoon of the butter to grease one 16-ounce or two 8-ounce ramekins. Coat the ramekins with the cocoa, tapping out the excess.
  2. In a large bowl, over a pan of simmering water, melt the chocolate and remaining butter. Stir occasionally until smooth. Remove from heat and add the vanilla. Whisk in the yolks one at a time until smooth. Set aside.
  3. In a clean bowl, beat the egg whites with the sugar, salt, and cream of tartar until stiff (but not dry) peaks form. Gently fold the egg-white mixture into the chocolate. Spoon into the ramekins. (The recipe can be made to this point up to 1 day ahead. Cover with plastic wrap and refrigerate.)
  4. Bake until puffed and set, 40 minutes for a 16-ounce soufflé, 20 minutes for two smaller ones. (If baked directly from the refrigerator, add 5 to 10 minutes.) Serve immediately with Custard Sauce.

Source: Chocolate Soufflé

My first SPS…

I’ve always been a LPS/zoanthid kinda reefer.  I’ve had the odd SPS here or there in old tanks, but they were usually the first to get clobbered by my algae issues.  I was also pretty intimidated by them.  Listening to the horror stories about calcium reactors freaking out and rapid tissue necrosis was enough to keep me sidelined with them.  Aside from the fact that they can be craaaazy expensive.

Now that my 50g has been up for about 18 months I think it is fairly stable at this point and decided to try adding an SPS to the tank.  There’s an area right under my Kessil A360WE that is too intense for any zoas that I know of.  I figured it might be a good spot to try a small SPS garden (is that a thing?).  A member of my local club gave me a great deal on a Red Planet acropora frag.

I added it to the tank on January 23, 2017.  The polyps immediately came out and it looked pretty happy to me.  I think it needs to color up a bit more, but it already has a nice deep red to it.

Red Planet Acropora added on 1/23/17

I shot a video of the polyps while I was messing around with my 90mm lens.  I thought it was kinda fun looking so I uploaded it to YouTube.

If it makes it, I’ll put up another post later showing the growth progression.  Wish me luck!

Pork Shoulder with Pineapple and Broccoli Recipe

Pork Shoulder With Pineapple And Sesame Broccoli

This recipes comes from the February, 2017 issue of Bon Apetit.  I’ve found most recipes from the magazine leave a bit to be desired, but this was a really good one.  It’s also by a chef who’s focused on healthy eating which is a nice plus.

I found the dressing on the brocolli was too much.  I’d suggest using half or maybe even less.  Otherwise this came out great!

Ingredients

  • 1 1½–2-pound skinless, boneless pork shoulder (Boston butt) or 4 pork blade chops
  • Kosher salt
  • 1 1-inch piece ginger, peeled, finely grated
  • 1 garlic clove, finely grated
  • 1 tablespoon plus 2 teaspoons balsamic vinegar
  • 1 tablespoon plus 2 teaspoons soy sauce
  • 1½ pounds broccoli
  • 3 small shallots, thickly sliced
  • 2 tablespoons olive oil
  • 2 tablespoons sesame seeds
  • 1 tablespoon vegetable oil
  • ½ small pineapple, peeled, cut into ½-inch pieces
  • 1 tablespoon unsalted butter

Preparation

Place a roasting pan in oven; preheat to 450°. Cut shoulder into four 1″-thick steaks; season with salt. Whisk ginger, garlic, 1 Tbsp. vinegar, and 1 Tbsp. soy sauce in a small bowl. Set both aside.

Remove stalk from broccoli. Peel, trim, and slice into ¼”-thick planks. Divide broccoli into large florets. Blanch stems and florets in a large saucepan of boiling salted water until bright green, about 10 seconds. Transfer to a rimmed baking sheet; let cool. Pat dry and toss in a medium bowl with shallots, olive oil, and sesame seeds; season with salt.

Heat vegetable oil in a large skillet, preferably cast iron, over medium-high. Cook reserved pork, undisturbed, until deep golden brown underneath, about 5 minutes. Turn and cook until an instant-read thermometer inserted into the thickest part registers 135°–140° for medium, about 3 minutes. Transfer to a cutting board and let rest 10 minutes.

Pour off fat from skillet and cook pineapple, tossing often and adding a splash or so of water if needed to keep mixture saucy, until slightly softened and browned in spots, about 3 minutes. Add 1 Tbsp. butter along with any pork juices on cutting board; toss until sauce is glossy and emulsified. Stir in remaining 2 tsp. vinegar and soy sauce. Season with salt.

Meanwhile, transfer broccoli mixture to hot roasting pan. Roast until lightly browned but still crisp-tender, 8–10 minutes. Add to reserved dressing and toss to coat; season with salt. Serve pork with pineapple and broccoli.

Source: Pork Shoulder with Pineapple and Broccoli Recipe | Bon Appetit

Charred Chicken with Sweet Potatoes Recipe

Charred Chicken With Sweet Potatoes And Oranges


I got this recipe out of the February, 2017 Bon Apetit.  The recipes in there are usually pretty hit or miss, but this was one of the best I’ve found from them.  Definitely use a cast iron pan to get nice crispy skin.  It also helps that this is a healthy dish.  My wife and my 4 year old both loved it.

I skipped the olives because well… olives are gross!  Ha!

Continue reading “Charred Chicken with Sweet Potatoes Recipe”

How to sterilize a Quarantine Tank

I came across a fantastic article on Reef2Reef today about how to properly sterilize a quarantine tank and its equipment.  It is really very simple and should only take you about 10 minutes to complete.  From that article:

1. Gather your cleaning equipment: Vinegar or Bleach, old rag or sponge, and all equipment used during QT like hoses, HOB filter ect. Be sure to dispose of any media inside the HOB filter and use new for the next batch of fish. Dispose of any air stones used as well.

2. Empty all the water out of the tank, leaving all the pvc elbows, heater, thermometer and any other equipment inside the tank.

3. Refill the tank with freshwater from the hose to about half way. Add 1 teaspoon of bleach per gallon of water if you choose to use bleach. Or just splash in about a ½ cup of vinegar. Vinegar won’t hurt you if you add too much, so the instructions are meant to keep you from wasting it or making your hands smell really bad. You can take this opportunity to soak everything in bleach or vinegar, but it’s not necessary.


4. Use your old rag or sponge to wipe everything down individually including each piece of equipment and the walls and bottom of the tank.


5. Fill the tank again with fresh water to rinse and empty. Take each piece of equipment out and rinse individually, then rinse the tank individually.


6. Set each piece aside to dry for several days to be sure every little nook and cranny has dried completely. The drying is the most important part of the whole process.

Super easy, right?!  Meredith was even kind enough to provide a video if you don’t like reading 🙂

Source: Video – How to sterilize a Quarantine Tank | REEF2REEF Saltwater and Reef Aquarium Forum

How much flow can my plumbing handle?

The question comes up quite a bit on the forums, “Can my drain line handle the flow from my return pump?”  Then come the usual questions about what type of drain setup is being used, how many tees and elbows, how far the drop is, etc.  Really what most people want to know is if they’re in the right ballpark or if they’re way out of bounds.  I’ve frequently used this excellent calculator over at Melev’s Reef.  Just a few simple questions and it tells you roughly what the flow rate you can expect is for your plumbing.

Melev also talks a bit about the theory behind how the calculations are made, if you’re a big ole nerd like me you’ll enjoy that part too.

Hydraulics for the Aquarist

Weird/New Way to Frag Zoas and Palys

I think we are all familiar with the standard way to frag zoas and palys.  You cut them off a rock or cut a frag plug and glue them on another.  Pretty simple, right?  I usually wind up whacking a few polyps in the process and as a result I’ve tended to just go with “natural frags” by putting a piece of rubble next to a colony and waiting until it grows onto it.  I came across a really cool thread on Reef2Reef.com where “GoFish” talks about a new and quite possibly brilliant approach.  Just cut the top of the polyp off an glue it to a plug and you wind up with two polyps…. How could that work!?

Continue reading “Weird/New Way to Frag Zoas and Palys”

Bayer Coral Dip

I’m filing this one under pest treatment, although it really is more of a pest preventer!  While the best way to ensure you don’t bring any unwanted pests into your tank is to use a coral quarantine tank (QT), that isn’t always an option.  This coral dip is safe for your corals, but deadly for most of the pests we want to keep out of our tanks.  It’s as simple as can be and it is very effective.

(more…)

Simple Homemade Chicken Ramen – Fork Knife Swoon

There’s a great ramen restaurant that opened near us.  We go there once a month or so, but we’d love to go more often!  That’s hard to do when you’ve got two little kids.  This recipe makes a great broth to start with.  I added baby bok choy and bean sprouts and used pork chops instead of chicken.  We’ll make it again!

A simple, comforting recipe for homemade chicken ramen noodle soup.

Source: Simple Homemade Chicken Ramen – Fork Knife Swoon