So it’s been 2 years since I changed my T5 lamps… big deal?

We all know that changing our T5 bulbs regularly is important, but seriously not many of us really stay that rigorously on top of the bulb changing schedule. BulkReefSupply, as part of their incredible BRSTV series, did an investigation into how true the generally accepted notion “change your lamps every 12 months” really is.

It finally dawned on me about 2 months ago that I couldn’t remember the last time I changed my T5s. My corals have been growing well, so I just let it be. One of the BRC club members brought up the subject of estimating PAR using a cheap lux meter. It reminded me, I HAVE A LUX METER! Wonder where my levels are….

Turns out they were lower than what I expected, but just how low? I ordered four new lamps from BRS and set out to find out.

Color Combination

I suppose a lot of this comes down to your personal preference. Some people like really blue tanks up above 12k, some people like a more natural 6500k look. I’m somewhere in the middle. I don’t like looking into a bowl of windex, but I want those fluorescent pops of color. I use a combo that’s pretty typical, I think.

2 ATI Blue Plus
1 ATI Purple Plus
1 ATI Coral Plus

From there, I adjust my color using my LED fixture to fine tune.

Aged Like a Fine Wine

When you’re going to be dimming your T5’s it is always recommended that you “burn in” or age your bulbs by running them for 50-100 hours so the phosphors all evenly distribute in the tube. I don’t know of anything saying you have to do this if you don’t dim, but I like to follow the process anyway. I have a 2 lamp fixture I use for QT that is perfect for this. I just pop two lamps in and come back for them in 2 days.

Watch out for the bump!

In this hobby, as we all know, only bad things happen quickly. That goes just the same for lighting. T5 lamps lose quite a bit of output as they age (see the YouTube video at the top for some numbers) and simply swapping in all new lamps can make for a huge bump in PAR and shock your corals. I decided to swap out one lamp per week for 4 weeks and chart the changes. Here are my results:

Week 0: Old Lamps @ 19,700 lux
Week 1: Blue Plus @ 20,200 lux
Week 2: Blue Plus @ 20,800 lux
Week 3: Coral Plus @ 25,900 lux
Week 4: Purple Plus @ 26,000 lux

From start to finish, that’s a whopping 35.6% increase in lux. Think your corals won’t notice a sudden jump that big? Trust me, they will!

Going Forward

Based on my own results and those from the BRS Investigation, I’m going to start swapping out on an 18 month cycle. I think that’s a good balance of lamp cost and lamp life. I don’t want to drop 35% again, but a 10-15% drop I can deal with.

Happy reefing!

Spammer Gonna Spam

My apologies if you’ve been to my page recently and came across thousands of SPAM posts. Apparently one of the plugins I was using to run this site had a vulnerability. I’ve since remedied the problem and deleted over 4,000 posts that were junk.

Happy Reefing!

Prusa Slicer Profile for CR-10S Pro

This is my Prusa Slicer profile for the Creality CR-10S Pro. This is built initially off of the CHEP Profile for the Ender 3 using Cura, but modified for Prusa Slicer and for the larger machine. This is a work in progress and I’ll keep updating this profile as I improve it.

Last Update: 1/5/2020

Prusa Profile (Right Click -> Save As)

Included in this profile:

  • CR-10S Pro Printer Settings and Bed Setup
  • PLA (3D Solutech), PETG (Hatchbox), and nGenn (ColorFabb) Filament Profiles
  • Print Settings for 0.6mm nozzle
  • Start G-Code
    • Mesh bed leveling before each print added

How to Move a WordPress Site

I’ve built this using WordPress. It is absolutely fantastic for blogs like this and makes putting things together and managing them very simple. I recently had the need to move another one of my WordPress sites from one URL to another. Thankfully, there is a great (FREE!) plugin to do just that. 

I’m sharing the link to the guide for doing this yourself if you ever come across the need:

https://www.wpbeginner.com/wp-tutorials/how-to-properly-move-wordpress-to-a-new-domain-without-losing-seo/

3D Printed Snap-Fit Case Tutorial

This is a slight deviation from reefing, but it is related for all of you DIY electronics reefers out there. I stumbled across this video recently and it is AWESOME! It shows you how to make a modular design for a snap-fit case. You can change a few variables and it automatically resizes and adjusts to the new variables.  

EcoTech Vortech Error Codes

One thing that I notice comes up quite a bit in discussions about EcoTech’s Vortech propeller pumps is, “what does

LED color mean?” EcoTech really should have made life a lot simpler for everyone and made these codes readily accessible. Their website can be a bit troublesome to navigate and find what you are looking for. 

I even know where these are and I have trouble getting to them quickly when I want them. Like other things I’ve included on this site, I’m going to add these to my list of useful items to have…

Frosted Fudge Brownies Recipe | Taste of Home

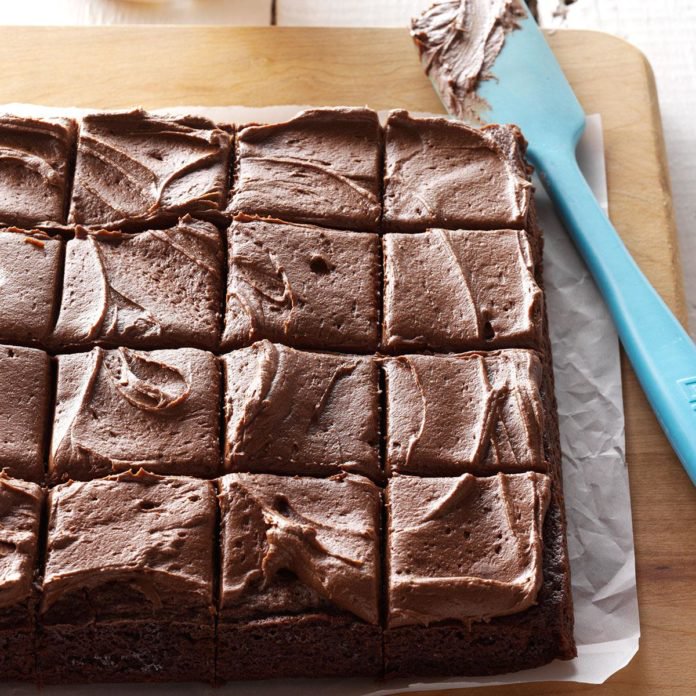
My oldest had a snow day today. What better to do on a day off from school than to bake?! I’ve made a lot of brownies from a lot of different recipes. They always leave something to be desired. These were almost perfect!

The ingredient list is small and you probably have everything in your cabinet already. On top of that, these are incredibly chocolate-y with just one type of chocolate. We added chocolate chips, just for fun but you do not need them.

These were more cake-like than fudgey, but they were moist and delicious. We might mess with the recipe a bit to get a fudgier end, but these are great as is.


Ingredients

  • 1 cup plus 3 tablespoons butter, cubed
  • 3/4 cup baking cocoa
  • 4 large eggs, room temperature
  • 2 cups sugar
  • 1-1/2 cups all-purpose flour
  • 1 teaspoon baking powder
  • 1 teaspoon salt
  • 1 teaspoon vanilla extract
  • FROSTING:
  • 6 tablespoons butter, softened
  • 2-2/3 cups confectioners’ sugar
  • 1/2 cup baking cocoa
  • 1 teaspoon vanilla extract
  • 1/4 to 1/3 cup whole milk

Directions

  • In a saucepan, melt butter. Remove from the heat. Stir in cocoa; cool. In a large bowl, beat eggs and sugar until blended. Combine flour, baking powder and salt; gradually add to egg mixture. Stir in vanilla and the cooled chocolate mixture until well blended.
  • Spread into a greased 13×9-in. baking pan. Bake at 350° until a toothpick inserted in the center comes out clean, 25-28 minutes (do not overbake). Cool on a wire rack.
  • For frosting, in a large bowl, cream butter and confectioners’ sugar until light and fluffy. Beat in cocoa and vanilla. Add enough milk until the frosting achieves spreading consistency. Spread over brownies. Cut into bars.


Source: Frosted Fudge Brownies Recipe | Taste of Home

Coral Update

It’s been just over 2 months since I got my first Battle Box from Battle Corals. I could not be happier! Everything has been growing, encrusting and they are starting to show their colors.

Not pictured are the ultra pink milli, fox flame and pink tabling acro. The latter two haven’t colored up yet and I forgot to take a pic of the milli 🙂

The rest of the tank has been growing pretty well too. I’m battling some cyano, which you can see in the pictures, but it is starting to die back. My nutrients have been stuck at zero and I was dosing PolypLabs Aminos to try and feed the corals. Turns out I was mostly feeding the cyano.

Here are just a few more random pics from the tank.

All pictures on this page were taken with a Nikon D5000 using a Tamron 90mm lens

Apple Cider Pancakes – Crunchy Creamy Sweet

It is cider time! We love making spiced cider on the weekends to sip on while watching a movie or just hanging out. I thought, “There has to be a cider pancake recipe!” I was not disappointed. These pancakes were AWESOME!


Apple Cider Pancakes – sweet and fluffy pancakes made with apple cider and topped with cinnamon sugar apples! Perfect fall weekend breakfast!

Source: Apple Cider Pancakes – Crunchy Creamy Sweet